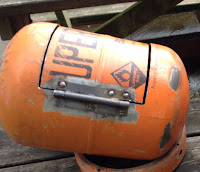
Materials
For this project you will need a old gas bottle. Make sure that you use one that is nearly empty!!! I would also advise you looking at several other videos on-line before cutting into it to make sure that all of the gas is removed. As you are working with metal you will need some way of joining pieces together, for this I used a MIG welder that my Dad had from a while ago. I also used a angle grinder to be able to cut many of the pieces. I depended on these two to this project and would strongly recommend getting these before attempting this.

I designed the stove on Google sketch up before I began to make to give me some sort of idea on the quantity and number of materials that I was going to need. To download the plans click the link below.
Gas Bottle Plans
Stage 1
The first stage of the Project was to getting the old gas bottle empty and prepared. To begin use a flat headed screwdriver to press down on the valve. This should release some of the gas. Using a wrench and a spanner twist off the valve and leave to stand for several minutes. With care push over the gas bottle releasing the majority of the remaining gas. Do this away from anyone and nowhere near an exposed flame. To remove the remainder of the gas fill it up with water and swill it around to remove any present as a liquid. Empty the water out and leave to dry.

Stage 2
Using an angle grinder cut the top and bottom rings off the bottle leaving the cylinder shape that will form the main body of the stove. To prevent scrapes in the final stove be careful to be as neat and precise as you can with the cuts. Using a jig (see video for instructions) mark a hole at the top of the cylinder, this must be 2cm smaller in diameter than the pipe that you will be using as a flue. Drill 3mm holes all around the circle periodically. Insert a jig saw cutter into one of these holes and cut out the circle. Keep the circle for later as it will be needed as an air regulator.

Stage 3
Mark out a square on the side of the cylinder, this is where the door will be. It should be wide enough to fit wood into it but small enough to be easy to open and close. Use an angle grinder to cut one vertical side (the one where the hinge will be located). Place the hinge across the cut and weld in place. This weld is very important as it must support the weight of the door and be very visible. Cut the three remaining sides and prise the door open.

Stage 4
Using an old grill cut the bed of the stove. This could easily be made from an old oven tray or BBQ grill. I was able to find an old fire bed and cut it down to size but measuring it with a card template.Using a old baffle (back plate) cut it to the size of your cylinder so that it can be slotted in and rests upright. This is optional but it prevents a lot of heat being lost up through the chimney by keeping it circulating inside the stove.
Stage 6
Using two metal collars one 1cm larger in diameter than the flue pipe and one cm smaller weld it around the hole that you have cut in the top of the stove. These will support the flue standing upright.
 Stage 7
Using a card tube match the contorts of the curve of the bottom of the bottle to act as a template. Cut the tube so that it matches the curve, slide it over a scaffold pole that I will be using for my legs. Use an angle grinder to cut the pole so that it matches the template; cut the other end of the legs. Repeat this 3 or 4 times depending on the number of legs you want. Position the body over the legs and weld the two together. I used a piece of ply with three holes in to keep the legs in position.
Stage 8
Drill a hole through the edge of the door and slide through a metal bar. On one end attach a handle and a latch on the other (I found a old stove handle and matching latch). On the inside of the stove weld a small piece of bar that the latch will sit to hold the door closed.
 Stage 9
Using the circle of metal we cut earlier use a angle grinder to cut away a section of the disk (this will become an air regulator). Weld in a long piece of metal bar to act as a handle to turn the air regulator. Using the hole that is in the circle where the valve was, find a bolt that screws fully in. Cut a matching size hole that allows the bolt to slide down through it easily. Cut a slit in the bottom of the bottle that matches the section that has been cut out of the regulator. Pass the bolt through the hole and the regulator an attach a nut to the other side. Weld this on an test it out. This should be able to control the amount of air that the stove lets in.
Stage 10
Slot the flue in place inside of the collar, insert the bed of the stove and then the baffle. You can then paint with fire proof paint, I had chosen to leave it silver but it started to rust so I will probably paint in in the future.


No comments:
Post a Comment